A small pattern I put together for Pride month with hearts in different pride flags, chevrons in pride flag colours, and the world in the center. The colours have been eyeballed, so feel free to switch them around if you like to.


A small pattern I put together for Pride month with hearts in different pride flags, chevrons in pride flag colours, and the world in the center. The colours have been eyeballed, so feel free to switch them around if you like to.

A little set of patterns of paintings by Piet Mondrian, a Dutch painter. Each pattern is 20×20 stitches, and in my case stitched on plastic canvas.

Sea slugs can be remarkably beautiful creatures, with bright colours and complex patterns. This little guy is not a specific type of sea slug, but more an experiment with hyperbolic crochet, a style I recently discovered. He will probably get some form of googly eyes, when I find some that suit.

Hyperbolic crochet can be used to make some amazing designs and also to study the structure of the universe and express mathematical concepts. It also makes amazing coral, and I encourage people to have a look at the Crochet Coral Reef project.
This pattern took me a few hours to design. I am happy for people to use the pattern for themselves (hence releasing it for free) but please credit me if you do. Please do not sell this pattern, and please do not post the pattern directly on your blog/site/etc, but link back to my blog: strangenessisconserved.wordpress.com
PDF of pattern: SeaSlug_Pyper_StrangenessIsConserved
There are several different stitch naming conventions. I use sc as:

In black:
0. ch 20
1. In third loop from end sc x 2, Along chain sc x1 in each loop, In last loop sc x 6, Rotate, sc x 1 in each loop back along chain, sc x 3 in final loop and join [48]
2. sc around, inc x 3 at each end (space out around end) [54]
3. sc around, inc x 3 at each end (space out around end) [60]
4-6. sc around, inc x 1 at each end [62][64][66]
7. In Back Loops Only sc around, dec x1 at each end [64]
8-9. Sc around, dec x 1 at each end [62][60]
10-12. Sc around, dec x 3 at each end (space out around end) [54][48][42]
Finish off leaving a long tail for sewing
To finish off start sewing the body together starting at one end. I used a whip stitch and kept the stitches on either side of the seam opposite each other. At the ends you may need to be slightly creative with your stitching to turn the corner into a neat join. Sew most of the seam together, and stuff before you reach the end. Then finish sewing.
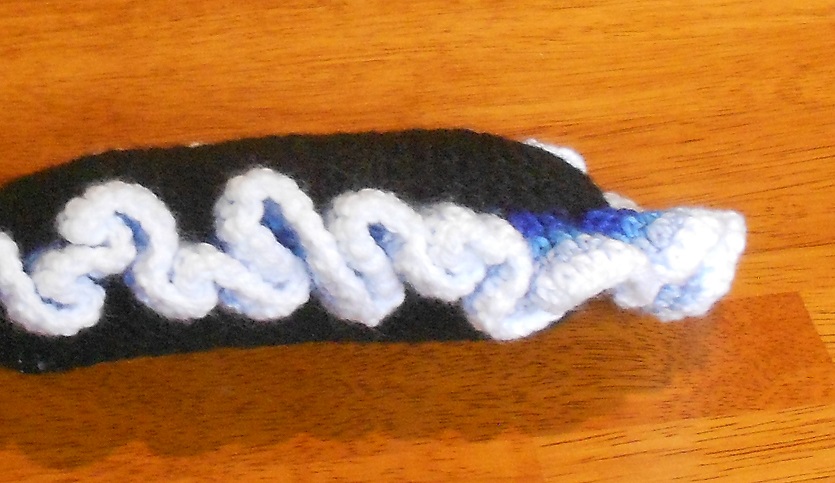
To start tie on your inner (in my case darkest) colour to the front loops of row 6-7 that are left sticking out. These loops will form the base for your ruffle
This repeating block quickly gave a very ruffled ruffle, so you may wish to try different patterns, such as [sc x 2, in x 1] to get a less frilly edge if desired.
Poros are small furry creatures native to the Howling Abyss map in League of Legends. Their favourite food is Poro-Snax, and they will happily follow around any summoner who feeds them.

For this pattern I used two different types of wool. The cream wool is thicker than the brown, and so I used a 4mm hook for the body. The horns and feet are made using a 3.5mm hook. If your yarns are the same thickness, and/or hooks are the same size, you may need to add an extra row of increase to the body of the Poro. In this case I recommend making the horns and legs first so you can see how the body looks.
This pattern took me quite a few hours to design. I am happy for people to use the pattern for themselves (hence releasing it for free) but please credit me if you do. Please do not sell this pattern, and please do not post the pattern directly on your blog/site/etc, but link back to my blog.
PDF of Pattern: PoroLoL_Pyper_StrangenessIsConserved
There are several different stitch naming conventions. I use sc as:
And dc as
In cream:
1. Magic circle (ch2, sc x 5) [6]
2. sc-inc x 6 [12]
3. (inc, sc) x 6 [18]
4. (inc, sc x 2) x6 [24]
5. (inc, sc x 3) x6 [30]
6. (inc, sc x 4) x6 [36]
7. (inc, sc x 5) x6 [42]
8-11. sc x 48 [42]
12. (dec, sc x5) x6 [36]
13. sc x36 [36]
14. (dec, sc x4) x6 [30]
15. sc x30 [30]
16. (dec, sc x3) x6 [24]
17. sc x24 [24]
18. (dec, sc x2) x6 [18]
Stuff at this point
19. (dec, sc) x6 [12]
20. Dec x6 [6]
Finish off

Make two
In brown:
1. Magic circle (ch2, sc, dc x3, sc) [6]
2. Ch2, sc, dc, dc-inc, dc, sc-inc [8]
3-5. Ch2, sc, dc x4, sc x2 [8]
6. Ch2, sc-inc, dc x3, dc-inc, scx2 [10]
Tie off and leave a long tail for sewing
Make four
Start with brown and change to cream:
1. Magic circle (ch3, dc x11) [12]
2. Sc x12 [12]
Tie off brown and change to cream
3-5. Sc x12 [12]
6. Sc-dec x6 [6]
Tie off and flatten the feet. Leave a long tail for sewing
The tongue is somewhat optional. Most of the time a Poro will have its tongue out ready to lick up any Poro-Snax in the vicinity. I freehanded mine, and did not write down what exactly I did. I also think there is room for a lot of improvement (or felt), so I will not attempt a pattern.
Pin the horns and feet into position. Once you are happy with their placement sew them into place
The eyes for my Poro are black buttons. Again these are pinned to place them before being sewn on. I happen to like button eyes, so use any eyes you want. Other types may need to be attached differently.
If you wish to add a tongue, position it once everything else is in place and sew it on.

A long time ago in a Galaxy far far away Darth Marow tightens his grip on the empire crushing any spirit of rebellion. Only young Bonewalker, still wearing the last memento of his mother, can restore peace and freedom to the galaxy…
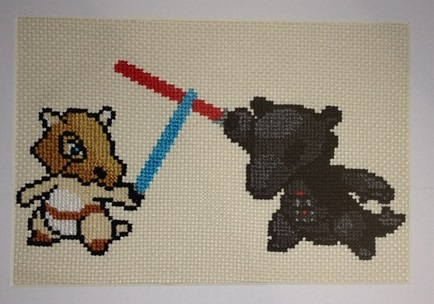
This was made as a swap gift over at Sprite Stitch. The colours I used are a mix of DMC and Sullivans, picked out by eye. Darth Marow is black and the darkest two shades of grey I could find, while Bonewalker is white and ecru with blond browns.

After playing pokemon Sapphire a bit recently I decided to try my hand at making a Marill. Why a Marill you ask? Because it is made from very simple shapes, and the main complication (the tail) was a technique I had encountered before and could appropriate. I am pretty happy with how it turned out, and has been drifting around my desk since.

A pattern for the Pokémon Marill. I used a 3.5mm hook and it is ~12cm long (~5 inch). I join my rounds unless otherwise indicated, but I think the pattern would still work if done in a spiral.
This pattern took me quite a few hours to design. I am happy for people to use the pattern for themselves (hence releasing it for free) but please credit me if you do. Please do not sell this pattern, and please do not post the pattern directly on your blog/site/etc, but link back to my blog: strangenessisconserved.wordpress.com
Pdf of pattern: PokemonMarill_Pyper_StrangenessIsConserved
There are several different stitch naming conventions. I use a sc as:
And ½ sc as:
In blue:
1. Magic circle 6 [6]
2. inc x 6 [12]
3. (inc, sc) x 6 [18]
4. (inc, sc x 2) x6 [24]
5. (inc, sc x 3) x6 [30]
6. (inc, sc x 4) x6 [36]
7. (inc, sc x 5) x6 [42]
8. (inc, sc x 6) x6 [48]
9-15. sc x 48 [48]
16. (dec, sc x6) x6 [42]
17. (dec, sc x5) x6 [36]
18. (dec, sc x4) x6 [30]
19. (dec, sc x3) x6 [24]
20. (dec, sc x2) x6 [18]
21. (dec, sc) x6 [12]
22. Dec x6 [6]
Stuff around row 19-20, and finish off
Make two, in blue:
1. Magic Circle 6 [6]
2. (sc, inc x2) x2 [10]
3-7. sc x10 [10]
8. sc x5
Finish off, leaving a long tail for sewing
For row 8 sc 5 then finish off. This gives a half row, which will make it easier to attach the feet at the right angle to the body
Make two, in blue:
1. Magic Circle 6 [6]
2. (sc x2, inc) x2 [8]
3-6. Sc x8 [8]
7. Sc x4
Finish off, leaving a long tail for sewing
For row 7 sc 4 then finish off. This gives a half row, which will make it easier to attach the arms at the right angle to the body
Using blue, then black:
The tail bob is made first out of blue:
1. Magic circle 6 [6]
2. inc x 6 [12]
3. (inc, sc) x 6 [18]
4. (inc, sc x 2) x6 [24]
5-8. Sc x 24 [24]
9. (dec, sc x2) x6 [18]
10. (dec , sc) x6 [12]
11. Dec x6
Stuff around row 9-10, finish off ball, cut off blue and tie on black. The black should be coming out of the bottom “pole” of the sphere.
The tail zig-zaggy bit is in black:
Make two, using red then blue:
1. Red Magic Circle 6 [6]
2. Red inc x6 [12]
Tie off red and change to blue
3. Blue (inc, sc) x6 [18]
4. Blue ½ sc x18 [18]
5. (sc, dec) x 6 [12]
6. Blue dec x6
Finish off, and hide the end. Squash the ears so the red curves in and the blue curves out.
In white
1. Magic circle 6 [6]
2. inc x 6 [12]
3. (inc, sc) x 6 [18]
4. (inc, sc x 2) x6 [24]
5. (inc, sc x 3) x6 [30]
6. (inc, sc x 4) x6 [36]
Finish off, leaving a long tail for sewing
Once all the components are made, pin them into position on the body. This may take a bit of fiddling around to get everything looking right. Sew them all into position once you have placed them. The ears will need a new blue wool thread to attach, as they are sewn at the base of each circle to the head, rather than where the yarn tied off.
Once the limbs are all attached place the button eyes. I used white thread to sew the buttons on through only one set of button holes (positioned at the top) to imitate the white gleam Marill is often shown having. The mouth is just stitched on with red wool.


Just a little pattern swapping around the colouring for the starter pokemon Squirtle, Bulbasaur and Charmander, and Pikachu. The colours are whatever I had lying around, a mix of DMC and Sullivans. I think I may do a set of bulbasaurs at some point, kind of like the eeveelutions, just because it is so fun to play around with.

When I decided to learn crochet mum gave me a small stash of wool from the local woolen mill where I grew up. The bright colours grabbed me immediately, and so I decided to make a small lap blanket. The navy wool I found about halfway through the project when I decided I needed something dark between the squares. I am pretty sure it is a different weight, but it was the best I could find in a small country town near the music camp I was on. While the blanket is fairly small (2 ft by 3 ft) it is big enough to thow over me at the computer or on the couch, and it has a lot of sentimental value. I love it.

The squares are all basic granny squares with three colours then two rows of navy. I stitched them together with whip/running stitch.
I have been procrastibaking instead of working on my assignments recently, so here is my Shortbread recipe:
Sieve the dry ingendients into a mixing bowl. Cut the butter into small pieces and put into the flour. Then with your fingers rub the butter into the flour mixture until it forms a dough. Roll and cut into bikkies, or roll about a tablespoon worth of dough between your palms and flatten to ~1cm thick. Place on a greased/baking paper tray and bake at 180 until golden brown. Ice if desired
Basic shortbread is always a welcome classic, but there is so much potential for variation.
Maps of the Pokemon regions Kanto, Johto, Hoenn and Sinnoh based on the maps in the Pokemon Centres.


For colours I used a bright leafy green, a slightly darker jungle green, and a slightly lighter more olivy green. Water is pale blue, and borders are white and navy-ish.
